|
1.
|
Introduction
|
|
|
This document illustrates and describes how to invoke speech bubble popups with
overlibmws. There are several ways to customize
overlib popups and using a long command line is not the recommended way.
You can instead set a default configuration for all popups that occur on your page
by using the OLpageDefaults function of the overlibmws.js core
module and then use only those commands and their parameters, if any, which
need to be changed for particular overlib calls. Read the
Command Reference for more information about other
ways to customize overlib popups. Place the script block for importing this
plugin module:
<script type="text/javascript"
src="overlibmws_bubble.js"></script>
in the head section after that for importing the overlibmws.js core module.
|
|
2.
|
Examples
|
|
|
The following examples illustrate the different types of
"bubble" popups that are currently available. The bold lettering
below each link shows the overlib call to invoke it. The second call is the
same except that the ADJBUBBLE command (see below) has been added.
The flower examples use the following style rule for the text:
.comic20 {font-family:'Comic Sans MS'; font-size:20px;}
-
flower
bubble adjust bubble size
overlib('This is a <b>flower</b>
bubble popup.',
BUBBLE, TEXTFONTCLASS, 'comic20')
-
oval
bubble adjust bubble size
overlib('This is an <b>oval</b>
bubble popup.', BUBBLE,
BUBBLETYPE, 'oval', TEXTSIZE, 2, FILTER, FILTERSHADOW,1,
FILTERSHADOWCOLOR,'purple')
-
square
bubble adjust bubble size
overlib('This is a <b>square</b>
bubble popup.',
BUBBLE, BUBBLETYPE, 'square', TEXTSIZE, '83%'
-
pushpin
bubble adjust bubble size
overlib('This is a <b>pushpin</b>
bubble popup.',BUBBLE,
BUBBLETYPE, 'pushpin', TEXTSIZE, '0.83em', RELX,-50, RELY,30,
FILTER, FILTERSHADOW,2, FILTERSHADOWCOLOR,'purple')
-
quotation
bubble adjust bubble size
overlib('This is a <b>quotation</b>
bubble popup.',
BUBBLE, BUBBLETYPE, 'quotation', TEXTSIZE, 'x-small')
-
roundcorners
popup. Adjust
bubble size not applicable.
overlib('This is a <b>roundcorners</b>
popup.', BUBBLE,
BUBBLETYPE, 'roundcorners',
TEXTSIZE, 2, MIDX,30, MIDY,0, WRAP,
FILTER, FILTERSHADOW,1,
FILTERSHADOWCOLOR,'purple')
|
Note that < and >
are the HTML entity references for "<" and ">"
respectively. These are used to avoid any problems associated
with firewalls, especially Norton's firewall. Also note that
the FILTER feature for IE v5.5+ browsers is being used with the
oval, pushpin, and roundcorners
examples (and with the non-bubble popups on this page).
|
|
|

|
|
Stuart Crawshaw originally implemented
speech bubbles with an earlier version of overlib and
offered it to the Yahoo overlib group.
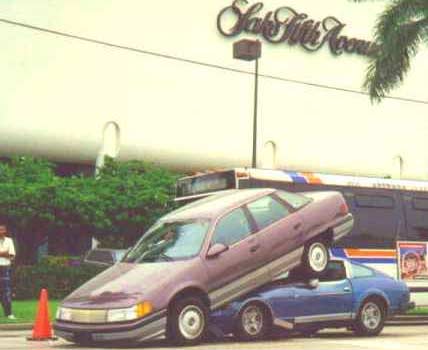
A simulation using overlibmws_bubble.js and the mws core module's REF-based
positioning and class-based text styling (TEXTFONTCLASS) is at left.
Hover over the blue car first, then the mauve car, and finally the man at the left of the picture to see the speech
bubbles invoked via an image map.
|
|
|
3.
|
Commands
|
|
|
-
BUBBLE
-
Toggle for whether to show a speech bubble popup (default 0).
Variable: ol_bubble
-
BUBBLETYPE type of bubble image
-
Specifies a string value, giving the type of "bubble" image to
display. Default value is 'flower'. Other permissible values are
'oval', 'square,' 'pushpin,' 'quotation,' and 'roundcorners'. The latter
bubbletype employs a 3 x 3 table with the outer cells filled with images
(cornerTL.gif, edgeT.gif, cornerTR.gif, edgeL.gif, edgeR.gif, cornerBL.gif,
edgeB.gif, and cornerBR.gif), with the actual content in the center cell, and
with the edge images scaled to match that content. These and the other
bubble images must be placed in a directory that can be specified via
OLbubbleImageDir (see Pre-Init String Variables,
below). The default value is './'); preloading will occur
automatically when the plugin is loaded.
Variable: ol_bubbletype
-
ADJBUBBLE
-
Toggles whether the "bubble" image will be resized proportionally
(i.e., so that the aspect ratio [width/height] is held constant), according
to how much content is in the popup. Default value is off (0).
This command has no effect when BUBBLETYPE is 'roundcorners'. Use of
this command might cause popups to be displayed slowly, depending on your
machine's processor speed, and perhaps should be used cautiously.
Variable: ol_adjbubble
-
RCBUBBLECOLOR color
-
A string value, giving the color for the textual content of speech bubble popups
which have 'roundcorners' as their BUBBLETYPE parameter. See the first
BUBBLE supplement for an example of its use.
Default value is '#ffffcc'.
Variable: ol_rcbubblecolor
-
BUBBLECLOSE
-
Toggles whether to block the normally automatic setting of NOCLOSE for bubble
popups that are sticky. Default value is off (0). Toggle BUBBLECLOSE
on if the popup content includes a close link that calls the cClick or cClick2
function for primary or secondary popups, respectively (see the Introduction of the Command Reference), and you wish to
require that it be used to close the bubble popup (i.e., without the popup also
able to close via a mouseoff).
Variable: ol_bubbleclose
Pre-Init String Variables: OLbubbleImageDir, OLbubbleImageSet,
OLbubbleImages, OLbubbleIMGsuffix, and OLbubbleRCsuffix
These string variables can be defined in a script block placed in the document's
head before the block for importing the plugin module.
OLbubbleImageDir can be used to replace the default of './'
for the directory where the bubble images are sought. For example, if it is
defined to '/images' they will be sought in a directory named images
off the account's root directory. OLbubbleImageSet is a comma-separated
list which defines the BUBBLETYPE tokens for the full set of available bubble
images. It defaults to 'flower,oval,square,pushpin,quotation,roundcorners'
and can be used to add tokens for any bubble images beyond those included in the overlibmws distribution. Note that all of the tokens for
roundcorners image sets must be last in the list and must begin with those same
12 characters. OLbubbleImages can be defined to a comma-separated list of
bubble images that are actually used by popups in the document (e.g.,
'flower,roundcorners' if only flower.gif and the roundcorners
image set are used), so that only those will be preloaded. If not defined, the
entire set of bubble images will be pre-loaded (see BUBBLETYPE,
above). OLbubbleIMGsuffix can be used to have a suffix added to
the root name of non-roundcorners bubble images (e.g., flower_foo.gif), and
OLbubbleRCsuffix can be used to do this for the roundcorners image set (e.g.,
cornerTL_foo.gif), which will be sought when the standard BUBBLETYPE values
are used. This makes it easy to use images which have modifications such as the
color of those from the overlibmws distribution, but
without any changes in their sizes. See the second
BUBBLE supplement for an example.
Pre-Init Array Variables: OLimgWidth, OLimgHeight, OLcontentWidth,
OLcontentHeight, OLpadLeft, OLpadTop, OLarwTipX and OLarwTipY
These array variables provide values for sizing the bubble images and positioning
content for the non-roundcorners bubbletypes, as explained in Sections 4 and 5,
below. If you add such bubbletypes beyond the five in the overlibmws distribution, you can copy the default array
definitions from near the top of the overlibmws_bubble.js plugin module,
add the values for your additional bubbletypes, and place the expanded definitions
in a script block before the block for importing that plugin module so that you need
not edit the module, itself, whenever it is updated. See the
mulitcolor Speech Bubbles support document for an
example.
Commands that are Disabled for Speech Bubbles include:
- BGCOLOR, FGCOLOR, BORDER, BASE
- BGBACKGROUND, CGBACKGROUND, FGBACKGROUND, BACKGROUND
- CAPTION
- FULLHTML
- SHADOW
- LEFT, CENTER (except for roundcorners)
- ABOVE, VCENTER (except for roundcorners)
- HAUTO, VAUTO (except for roundcorners)
- WRAP, WIDTH (except for roundcorners)
|
|
4.
|
How it works
|
|
|
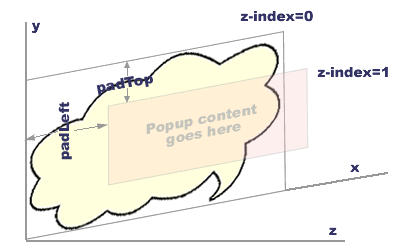
A schematic representation of what is done for a non-roundcorners BUBBLE popup is
shown in Figure 1.

Figure 1. Schematic illustration of a BUBBLE popup.
In an early version, REB used two absolutely positioned div containers written to
the overDiv container. The first div container held the
bubble image and was positioned at the upper left corner (top=0px, left=0px).
This was pointlessly complicated, and in the overlibmws
implementation the image is simply written into the overDiv
container with width and height attributes specified to the intended width and
height of the popup. The other div container (id="bContent") is
retained and contains the textual (plain text or HTML) content for the popup.
It is sized and positioned appropriately relative to the top, left corner of the
image. Before the layer generation functions (LGFs) are called with this
overall content, the fgcolor and bgcolor values are set to the null string and the
border value is set to 0. Automatic horizontal/vertical positioning
(hauto/vauto) and wrap/width (except for a 'roundcorners' popup) are turned off.
Since the overDiv container is absolutely positioned, it serves
as the positioning context for the overall content. The visibility of the
textual content is established via a higher z-index value relative to that of
the overDiv container, which is inherited by the image.
Another thing to consider is what happens when the popup's height exceeds the
content area height. There are two ways to proceed on this matter.
-
Increase the content area height while keeping the aspect ratio of the image
fixed. This means that the content width will also change which would
require that the popup be regenerated, leading to possibly new height and width
values. This also means that the layer generation routine would have to be
called again with the new content area width. While this approach is
probably the most accurate, it would require at a minimum that at least two
additional calls to the layer generation routine be made in order to estimate
approximate width/height values that would contain the popup's content.
This approach may be added later, along with a parameter, that the user can set
to indicate that this approach be taken.
-
For now, a more approximate method is used when the popup's height exceeds
the content area height. The image's height is increased without keeping
the aspect ratio fixed. The popup's height is compared to the content
area height. If it is smaller, half of that difference is added to the
OLpadTop value so that the popup is positioned vertically in
the middle of the content area. If this difference is negative, the absolute
value of the difference is added to the image's height while keeping it's width
fixed. This means that there will be some distortion of the background image,
but for most cases, it should not be too bad since most popups have content widths
less than the content area height. This approach also means that the layer
generation routine doesn't need to be called again.
For a roundcorners BUBBLE popup, the textual (plain text or HTML) content is handled
similarly to the content in a CAPTION-less non-BUBBLE popup, and then the 8 images
in the bubbletype's set (4 corners and 4 edges) are sized and positioned around that
content. There thus is no need for concern about aspect ratios. However,
if any images are included within the content (e.g., for a Close button which makes a
cClick or cClick2 call in a primary or secondary popup, respectively), their width
and height should be indicated in their img tags to ensure proper sizing of the edge
images on the first fetch (i.e., before the images are in local cache).
|
|
5.
|
Adding more "bubble" images.
|
|
|
In setting up a "bubble" popup, REB tried to do it in such a manner that
the user can easily add more images if s/he so chooses, and the overlibmws implementation further facilitated this by adding
pre-init string and array variables (see above) to avoid any need
whatsoever for
editing of the overlibmws_bubble.js plugin module. The additions
should be "gif" images because the area outside the boundaries of the
"bubble" outline will be set to transparent and, at present, this module
does not also provide support for "png" images.
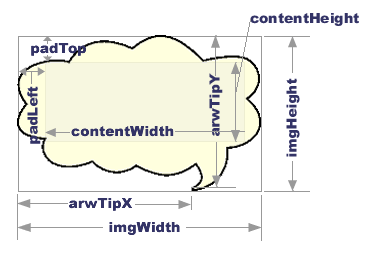
The pertinent quantities required for each added non-roundcorners image are
illustrated in Figure 2.

Figure 2. Quantities required
for each added "bubble" image.
-
The image's width (OLimgWidth) and height
(OLimgHeight) values (in pixels)
-
The content area's width (OLcontentWidth)
and height (OLcontentHeight) values (in pixels).
This area must be rectangular. The easiest way to determine
this is by a graphics program; determine the largest rectangular
content area that will fit inside boundaries of the "bubble"
outline.
-
The left (OLpadLeft) and top (OLpadTop)
displacement of the content area from the upper left hand
corner of the image (in pixels).
-
The x-offset (OLarwTipX) and y-offset (OLarwTipY)
of the tip of the "bubble" outline from the upper
left corner of the image (in pixels). The OLarwTipX value
is subtracted from the (default or specified) OFFSETX command value so as to move
the popup to the left. Use a negative value if you instead intend to have
the popup moved to the right. The OLarwTipY value is added
to the (default or specifed) OFFSETY command value, but is converted to a negative
number (to achieve a subtraction) if (as, e.g., in the case of the flower image,
but not, e.g., in the case of the oval image) the OLarwTipY value
is greater than half the height of the popup. That heuristic achieves correct
vertical positioning for the bubble images in the distribution, which point either
up or down, but might not be appropriate for bubble images you create yourself if
they point horizontally, in which case you should choose the sign of the
OLarwTipY value based on empirical testing. Make sure that
your OLarwTipX and OLarwTipY values (together
with the default or specifed OFFSETX/Y command values) will cause the popup
(including its transparent portion) to lie outside the cursor's position when it
is displayed. If that doesn't happen and the popup is not STICKY, the popup
will flash on/off as you move the cursor. This flicker occurs because the
mouseover/mouseout events are being toggled on/off.
The items in BOLD lettering are what these quantities are called in the javascript
code (with an OL prefix in the overlibmws
implementation to avoid namespace collisions). To add a new image to the
"bubble" collection, simply set up the pre-init string and array variable
definitions as discussed in
Section 3, above.
For additions of roundcorners image sets, at present the 8 images in each set must
have a height and/or width of 14px to form an encasement of the content. The
4 corner images must be 14 x 14 squares (with the portions outside the
rounding made transparent) and the 4 edge images must be 14px by typically 2px in
their scalable dimension. Only the pre-init string variables apply
(i.e., not also the pre-init array variables). If you've only
changed the background color for the overlibmws
distribution's image set and you will be using only one roundcorners image set in
the document, then simply define the OLbubbleRCsuffix string variable, as
demonstrated in the
first and
second BUBBLE supplements. If you have two or more
roundcorners image sets to be used in the same document, then instead include them
in OLbubbleImageSet and OLbubbleImages definitions, making them
the last entries in those comma-separated lists (i.e., following any non-roundcorners
entries), as demonstrated in the
mulitcolor Speech Bubbles support document.
|
|
|
